
Keynote,看过苹果发布会的朋友都不会对Keynote感到陌生。对,就是当年乔帮主应忍受不了微软的PPT于是开发的一款自己使用但是后来放到了iWork里面向大众公布出来的一款幻灯片制作软件。其酷炫并且符合逻辑的动画效果令人影响深刻,也帮助了演讲者更生动地完成演讲。
我就是一个重度的Keynote骨灰级使用者。我用Keynote已经有3年了,平时我要做图、做软件的原型、甚至是一些交互动画全是拿keynote完成的。就是因为Keynote这款软件的易用性已经让我不会傻到同时有笨重的PS、AE和轻便的Keynote我会放弃后者而使用前者。我保证你用过Keynote之后也一定会上瘾的。后期有机会我一定要出一个keynote使用心得,关于如何做出优秀的幻灯片的一些体会,以及如果使用keynote做出App交互原型。
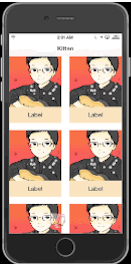
其中Keynote有一个无论是视觉层面还是逻辑层面都很出色的动画效果,叫做 神奇移动(Magic Move) 。大概感觉就像这样:

可以看到这个效果很好地衔接了上下两个具有相同元素的幻灯片。这就使得演讲者在演讲过程中逻辑变得十分清晰,让观众也能很好地明白演讲者在讲什么。
然后,有了UIViewTranstion,一切转场都变得可能。只有你想不到的没有你做不到的。
今天我们要实现的最后效果大概像这样:
好,下面开始详细的分析。
在讲动画之前,我们先做一些准备,把界面和层级画出来。
我们用一个UINavigationController 去控制两个控制器,一个是 Collection ViewController 作为第一个控制器,另一个是 ViewController 作为第二个控制器。
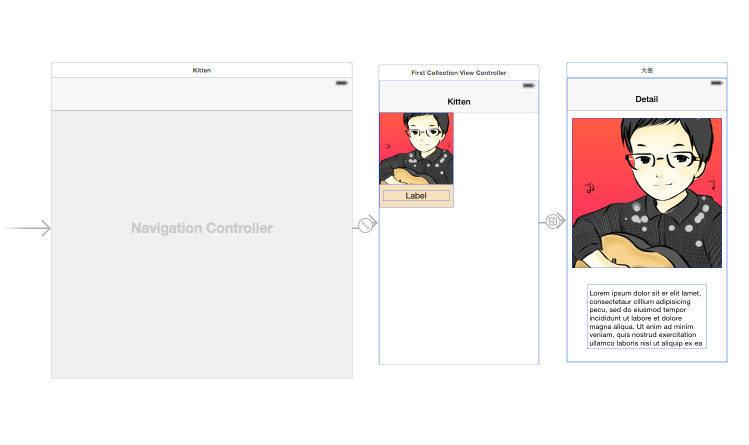
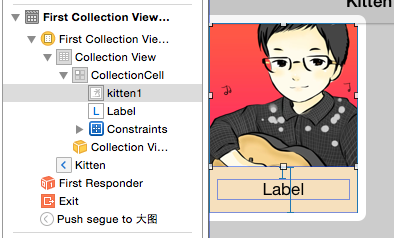
在第一个 Collection ViewController 上,我们布置好界面。准确地说,应该是布置好 Collection Cell .
我们在cell上拖一个UIImageView 和 一个 UILabel,布置好约束。
同样的,我们在第二个控制器 SecondViewController 也画好相应的界面,并配置好约束。
1、设置一个UIViewControllerAnimatedTransitioning
使用UIViewControllerAnimatedTransitioning 协议的对象来实现。
新建一个继承自 NSObject 的类,取名 MagicMoveTransition。该类去实现这两个其中的两个协议方法,然后就可以使用他来实现我们的两个类的过渡效果了。
第一个方法直接就返回一个时间。
- (NSTimeInterval)transitionDuration:(id <UIViewControllerContextTransitioning>)transitionContext{
    return 0.3f;
}
后一个协议方法,
- (void)animateTransition:(id <UIViewControllerContextTransitioning>)transitionContext;
方法是定义两个 ViewController 之间过渡效果的地方。这个方法会传递给我们一个参数transitionContext,该参数可以让我们访问一些实现过渡所必须的对象。
关于这个参数transitionContext,我额外岔开话题补充一下, 该参数是一个实现了 UIViewControllerContextTransitioning可以让我们访问一些实现过渡所必须的对象。
UIViewControllerContextTransitioning协议中有一些方法:
1、- (UIView *)containerView;
    //转场动画发生的容器
2、- (UIViewController *)viewControllerForKey:(NSString *)key;
    // 我们可以通过它拿到过渡的两个 ViewController。
3、   - (CGRect)initialFrameForViewController:(UIViewController *)vc;
    - (CGRect)finalFrameForViewController:(UIViewController *)vc;
    //通过这两个方法,可以获得过度动画前后两个ViewController的frame。
有了这个铺垫,我们把视线拉回到
- (void)animateTransition:(id <UIViewControllerContextTransitioning>)transitionContext{},现在我们来实现它。
1、先拿到前后两个viewcontroller 以及 实现动画的容器
- (void)animateTransition:(id <UIViewControllerContextTransitioning>)transitionContext{
    UIViewController *toVC   = [transitionContext viewControllerForKey:UITransitionContextToViewControllerKey];
    UIViewController *fromVC = [transitionContext viewControllerForKey:UITransitionContextFromViewControllerKey];
    UIView *containerView = [transitionContext containerView];
}
2、接下来,获得我们需要过渡的 Cell,并且对它上面的 imageView 截图。这个截图就会用在我们的过渡效果中。同时,我们将这个 imageView 本身隐藏,从而让用户以为是 imageView 在移动的。
——————————
补充一个知识:
IOS-- UIView中的坐标转换
// 将像素point由point所在视图转换到目标视图view中,返回在目标视图view中的像素值
- (CGPoint)convertPoint:(CGPoint)point toView:(UIView *)view;
// 将像素point从view中转换到当前视图中,返回在当前视图中的像素值
- (CGPoint)convertPoint:(CGPoint)point fromView:(UIView *)view;
// 将rect由rect所在视图转换到目标视图view中,返回在目标视图view中的rect
- (CGRect)convertRect:(CGRect)rect toView:(UIView *)view;
// 将rect从view中转换到当前视图中,返回在当前视图中的rect
- (CGRect)convertRect:(CGRect)rect fromView:(UIView *)view;
你可以想像成额外复制了一个图层叠加在原来那个图层上面,但是这个图层是直接加在最底下的 containerView 。 ——————————
了解了坐标转换,我们接下来:
    //对Cell上的 imageView 截图,同时将这个 imageView 本身隐藏
    CollectionViewCell *cell =(CollectionViewCell *)[fromVC.collectionView cellForItemAtIndexPath:[[fromVC.collectionView indexPathsForSelectedItems] firstObject]];
    UIView * snapShotView = [cell.imageView snapshotViewAfterScreenUpdates:NO];
    snapShotView.frame = [containerView convertRect:cell.imageView.frame fromView:cell.imageView.superview];
    cell.imageView.hidden = YES;

    //设置第二个控制器的位置、透明度、
    toVC.view.frame = [transitionContext finalFrameForViewController:toVC];
    toVC.view.alpha = 0;

    //把动画前后的两个ViewController加到容器中
    [containerView addSubview:snapShotView];
    [containerView addSubview:toVC.view];
3、现在来做 view 的动画,移动之前生成的 imageView 的截图,淡入第二个 viewController 的 view。在动画结束后,移除 imageView 的截图,让第二个 view 完全呈现。
    //动起来。第二个控制器的透明度0~1;让截图SnapShotView的位置更新到最新;
    [UIView animateWithDuration:[self transitionDuration:transitionContext] animations:^{
        toVC.view.alpha = 1;
        snapShotView.frame = [containerView convertRect:toVC.imageViewForSecond.frame fromView:toVC.view];
    } completion:nil];

    //告诉系统动画结束
    [transitionContext completeTransition:!transitionContext.transitionWasCancelled];

记住,一定别忘了在过渡结束时调用 completeTransition: 这个方法。
2.我们要开始使用写好的动画了
我们需要告知 UINavigationController 去使用 UIViewControllerAnimatedTransitioning.
和上一篇转场不同的是,上一篇是两个ViewController之间的转场,所以需要第一个VC去实现 UIViewControllerTransitioningDelegate
但是,这里不是单独两个ViewController之间的转场,而是用一个NavigationController去控制转场的。所以,在这个例子中,我们应该让当前这个ViewController去作为Navigation的代理对象。
@property(nonatomic, assign) id<UINavigationControllerDelegate> delegate;
所以比较好的一个地方是在 -(void)viewDidAppear:(BOOL)animated里面:
-(void)viewDidAppear:(BOOL)animated{
    self.navigationController.delegate = self;
}
接着实现对应的协议方法,我们看到有如下协议方法
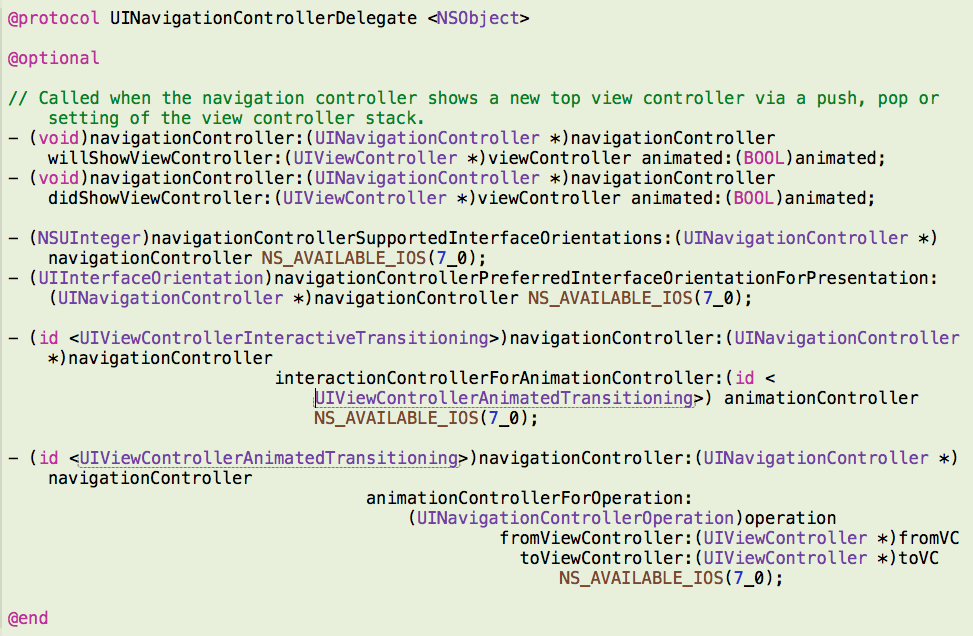
这里我们选择最后一个方法实现:
- (id <UIViewControllerAnimatedTransitioning>)navigationController:(UINavigationController *)navigationController
                                   animationControllerForOperation:(UINavigationControllerOperation)operation
                                                fromViewController:(UIViewController *)fromVC
                                                  toViewController:(UIViewController *)toVC{

    if ([toVC isKindOfClass:[SecondViewController class]]) {
        MagicMoveTransition *transition = [[MagicMoveTransition alloc]init];
        return transition;
    }else{
        return nil;
    }
}
运行看一下,应该可以从前一个控制器转到后一个了。
接下来,我们依样画葫芦,实现从第二个视图回来的动画。这里我不再赘述,一些注意点我会直接以注释的形式写在代码里,你可以在文末的下载地址下载源码看到。
3.添加手势百分比驱动
我们希望让这个过渡在用户手指从屏幕左边边缘划入时产生互动。为了做到这点,我们将使用一个 iOS 7 新加入的手势识别器, UIScreenEdgePanGestureRecognizer。
我们在第二个 viewController 的 viewDidLoad 方法中,创建这个手势识别器。
- (void)viewDidLoad {
    [super viewDidLoad];

    …
    UIScreenEdgePanGestureRecognizer *edgePanGestureRecognizer = [[UIScreenEdgePanGestureRecognizer alloc]initWithTarget:self action:@selector(edgePanGesture:)];
    //设置从什么边界滑入
    edgePanGestureRecognizer.edges = UIRectEdgeLeft;
    [self.view addGestureRecognizer:edgePanGestureRecognizer];
}
现在我们可以识别该手势了,然后我们用它来设置并更新一个 iOS 7 新加入的类的对象。
UIPercentDrivenInteractiveTransition。这个类的对象会根据我们的手势,来决定我们的自定义过渡的完成度。我们把这些都放到手势识别器的 action 方法中去,具体就是:
-(void)edgePanGesture:(UIScreenEdgePanGestureRecognizer *)recognizer{
    //计算手指滑的物理距离(滑了多远,与起始位置无关)
    CGFloat progress = [recognizer translationInView:self.view].x / self.view.bounds.size.width;
    progress = MIN(1.0, MAX(0.0, progress));//把这个百分比限制在0~1之间

    //当手势刚刚开始,我们创建一个 UIPercentDrivenInteractiveTransition 对象
    if (recognizer.state == UIGestureRecognizerStateBegan) {
        self.percentDrivenTransition = [[UIPercentDrivenInteractiveTransition alloc]init];
        [self.navigationController popViewControllerAnimated:YES];
    }else if (recognizer.state == UIGestureRecognizerStateChanged){
    //当手慢慢划入时,我们把总体手势划入的进度告诉 UIPercentDrivenInteractiveTransition 对象。
        [self.percentDrivenTransition updateInteractiveTransition:progress];
    }else if (recognizer.state == UIGestureRecognizerStateCancelled || recognizer.state == UIGestureRecognizerStateEnded){
    //当手势结束,我们根据用户的手势进度来判断过渡是应该完成还是取消并相应的调用 finishInteractiveTransition 或者 cancelInteractiveTransition 方法.
        if (progress > 0.5) {
            [self.percentDrivenTransition finishInteractiveTransition];
        }else{
            [self.percentDrivenTransition cancelInteractiveTransition];
        }
    }

}
最后一步,别忘了告诉navigationController 去用它。
在SecondViewController.m 里,实现UINavigationControllerDelegate 中的另一个返回UIViewControllerInteractiveTransitioning的方法:
- (id <UIViewControllerInteractiveTransitioning>)navigationController:(UINavigationController *)navigationController
                          interactionControllerForAnimationController:(id <UIViewControllerAnimatedTransitioning>) animationController{
    if ([animationController isKindOfClass:[MagicMoveInverseTransition class]]) {
        return self.percentDrivenTransition;
    }else{
        return nil;
    }
}
现在就已经可以正常使用了。源码点击这里